Wednesday, February 10, 2016

Frozen Birthday Party

Frozen Birthday Party

My daughter requested a Frozen Party for her 6th birthday.  Given that Frozen was THE thing at the time, we'd been to quite a few Frozen-themed party.  By the time my daughter's bday rolled around, practically everyone had had such a party so it was starting to get "old" and we needed to add some creativity to the party.  On the plus side, nearly all the little girls had Elsa costumes that they wore to the party.  The birthday girl dressed up like Anna.  It worked pretty well.

We tried to do some things that were a little bit different from her friends' parties, so we did:

  • Coloring
  • Bracelet making
  • Snow globes
  • Cake
  • Snow!


Coloring is pretty straight-forward.  I just found free coloring pages on the Internet and printed them.   I bought some snowflakes on clearance.   Then I put out some crayons and glitter glue.  Ta-dah!  Kind of ridiculously easy, but perfect for the preschool-kinder crowd.  Some of the parents got engaged with the coloring, too.


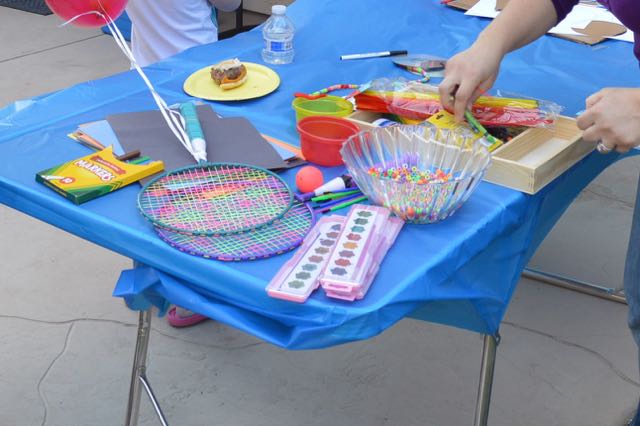
The bracelet making is pretty straight-forward, too.  I got beads, elastic, ribbon, and plastic bowls from Dollar Tree and Walmart.  The metal snowflakes were an ebay find (for like $2!)  Both adults and kids enjoyed making bracelets.  I was impressed that we ended up with very few beads on the floor.  Protip: tie one bead to the end before the kids start stringing them so there's less risk of losing them all and having frustrated kids.


Another activity, the snow globes, were a unique part of our party.  We got some baby food jars for free from someone who no longer needed them.  I painted the lids blue and sprinkled with glitter so they wouldn't say "gerber" or anything.  I bought a bunch of Frozen-themed stickers (Party City), some clear packing tape, and some glitter (Dollar Tree and Walmart).  There were instructions to put stickers on the tape and then tape on the top so the stickers were sealed inside.  Then the kids (or parents) would roll the tape into a cylinder and put it inside the baby food jar.  Add some water/glycerin and then sprinkle in some glitter.  Put the lid on tightly.  Snow globe!


Most of the decorations were snow flakes (easy to get for our early-January party) or left over decorations from alllllllllll those other Frozen parties.  (Thanks for donating to us, folks!)  We got Frozen-themed and solid-color balloons for $1 each at the Dollar Tree and one large balloon from Party City (for like $12!  Yikes!)  The kids were thrilled to have their own balloons to take home.


For the cake, we just got one from the local grocery store.  I also wanted to serve ice cream so I filled a muffin tin with Frozen liners (of course!) and then scooped the ice cream in before the party.  That made it really easy to pass out during the party.  As the ice cream got warmer, the cupcake papers got mushy and things got messy, but most kids didn't let it go that long so it was fine, especially if it was on their plate with their cake.

The biggest hit in this party was the "snow."  We played "Let it go" and the kids immediately ran around singing and acting out the song enthusiastically.  At a mid-song crescendo, the birthday girl's uncle hit a button on the snow machine he'd set up in secret and it snowed on the mob of Anna and Elsas.  Quite the hit on a 70 degree day!  In fact, it was such a hit, I didn't get any good pictures of the kids as they all ran around screaming with glee.


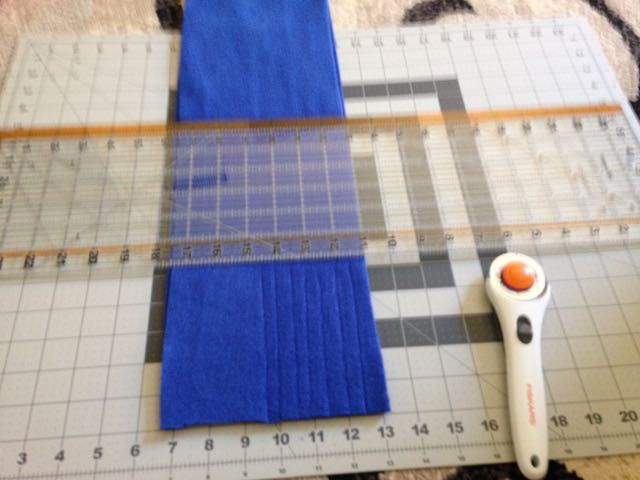
Finally, we sent the kids off with some hopefully useful party favors.  Along with their bracelets, snow globes, and balloons, they got fuzzy gloves and a fleece scarf.  I got a large piece of remnant fleece and cut the scarves myself.  Pretty simple, especially if you have a rotary cutter.


Happy Birthday!

Sunday, January 31, 2016

Construction Party

Construction Party

For his 3rd birthday, we decided to have a construction party.  We had burgers for lunch and some snacks along with some construction-related activities.

The decor was fairly simple.  We used light yellow table cloths and wrapped them in caution tape.   I put some across the fence in the backyard but it caused some panic with one of the party goers.  "What's wrong with the fence!?"  Nothing, it's just some decorations for the construction party.  "Ohhhhh...." After that, I thought I'd better not put caution tape on the play structure or it might be avoided, too. I liked it on the tables and that didn't seem to confuse anyone, though.


The party favors were passed out at the beginning of the party.  They got plastic construction hats, home depot tool belts, levels, tape measures, and screw drivers.  (Hats were from Amazon.  Tools belts, tape measures, and levels were from Home Depot for less than $1 each.  Screwdrivers were from Dollar Tree in multipacks for $1.)  In addition to being fun tools the kids could use, they looked adorable!


For activities, I got a set of interlocking popsicle sticks that the kids could just use to build whatever they wanted.  I think I got them on Amazon, but I've seen them at several stores.


We also set up some screwing boxes on the ground.  These were just old boxes we happened to have.  I wrapped some construction tape around them so they'd look more "festive" and then partially screwed in several screws.  The kids came by with their screw drivers and enjoyed screwing and unscrewing them.


The kids also enjoyed the play structure and playing in the backyard when they weren't munching on their cheese burgers.  They were certainly not bored!

Then we had cake.  We'd asked for a construction theme, but the local grocery store bakery was out of the plastic toys they put on top.  No problem, we got our own set (5 pack of construction vehicles from Target for $6) but they mysteriously disappeared just prior to cake time.  (It turns out that one of the little party attendees took off with them, but we didn't recover them until after the party.)  It was important to have some vehicles though, because it looked a bit like... uh... maybe a big rabbit had left a deposit.  Not a great look for a cake.


Fortunately, a dig through the car drawer and a quick wash and we had a suitable vehicle.  Whew!  Not that the kids cared, though.  Cake is cake!  Yum!


Happy Birthday, Steven!

Wednesday, January 27, 2016

Dinosaur Birthday Party

Dinosaur Birthday Party


My daughter wanted to have a dinosaur party for her 7th birthday.  We talked about a lot of options from ideas I found on the Internet, but here's what we ultimately did:

  • Pith helmet decorating
  • Dig pit with t-rex bones and other treasures
  • Baking soda eggs
  • Plaster and ice excavations
  • Volcano cake


The pith helmets are pretty easy and straightforward.  I bought some helmets (about $8 for a dozen on Amazon) and some stickers (a couple of foam packs from the dollar tree and some stickers from Target).  Kids could decorate them as they chose.  The regular stickers didn't seem to stick to the plastic helmets as well as the foam stickers, but they stuck well enough.  I think I'd just get more foam stickers in the future though.
Pith helmet decorating station


The dig pit was a planter box that we filled with sand.  I put a couple of strips of poster board on the bottom and sides so the sand wouldn't escape easily.  It was filled very nicely with about 100lbs of sand. I got 50lb bags from Home Depot at about $5 each.  (We got a 3rd bag but didn't use it.) 

Sand box


We made plaster of paris t-rex bones using a sand mold which were about $5 from Oriental Trading Co.  We used several cups of plaster of paris for a complete mold (maybe 8 cups?), but I learned they didn't need to be fully filled after the first one, though they did break more easily if I made them thinner.  I ultimately used about 10-12 lbs of plaster of paris, bought in 8lb tubs for about $5 from Michael's (using a 50% off coupon from their website), for 3 complete t-rex molds.

Plastic sand molds used to make the bones


 I recommend putting down a newspaper or dropcloth before starting to work with the plaster of paris.  We didn't the first round and I had to clean up a lot of plaster from the back patio.  It also dried out my hands a lot so I wore disposable gloves the next time.  Having not worked with plaster of paris since I was a kid, I forgot about these key details.  :)  Some pieces broke when we got them out of the molds, but I argued that's more authentic so it's fine.   The final product was pretty neat, I think.

Plaster of Paris t-rex bones


The kids really liked finding the bones in the sand.  I also hid some "treasures" which were shells and glass gems from the Dollar Tree.  (The kind you'd fill a vase with.)  I used some ikea frames and some old screen (originally from Home Depot for $5) to make sifters, but that really wasn't needed.  We also put some cheap shovels out but those were eventually broken and also not really needed.  The kids liked just leaning into the pit and digging with their hands.

Bones, glass gems, and shells in the sand.


They loved to dig in the sand.


I also put the "eggs" into the dig pit, but I think those would have been fine just out on the table and not buried.  (I had to keep replenishing the dig pit so that the first set of kids wouldn't get everything.  It might have just been smarter to have those set out on the table.) 

It was really easy to make the baking soda eggs.  I got some tiny plastic dinosaurs (some from Dollar Tree, some from Party City, and some donated from our local Buy Nothing group), and made eggs around them with baking soda.  I got a giant bag of baking soda for about $8 from Costco.  I doubt we used even half of it for about 30 eggs.  Just add a small amount of water to the baking soda, form an egg around the animal, let dry (usually 24 hours for us). 

My kids made most of the eggs by themselves and had a great time doing it.  I recommend cleaning up right away or the baking soda dries annoyingly to the work space.  It's not too hard to clean up, but easier when wet.  And of course vinegar will help with clean up, too.  All my eggs were white, but I think a little food coloring would be an easy addition to make them more interesting.  I was concerned that the food coloring might make both the prep and opening areas unnecessarily messy so I opted for white.  The kids seemed very happy.

Baking soda egg.   Now to get the small dino out!


The kids could break into the eggs by using a paintbrush (they tried brushing and also jabbing with the back end) and I also put out vinegar as an option.  They were able to get into it relatively easily and everyone squealed with glee when they got to their dinosaur-- even grandma!  :)

Small dinosaurs in baking soda eggs.  The vinegar makes it extra fun!


Some kids were drawn to the dinosaur skeletons that were encased in plaster or ice.  I don't think anyone successfully got any out of plaster but they were still fun to try and seemed to add an interesting decor.  The skeletons were an Ebay find but also available on Amazon.  The blocks are layers of plaster mixed with sand that I mixed in disposable baking dishes.  I chose not to put out any chisel type tools because of the anticipated crowd (lots of young kids), but that'd be wise for other groups.  Even though no one got a skeleton out, I still think it was a good party addition.  It was cheap and easy since I was already working with plaster for the bones.  Maybe I'd go heavier on the sand and use less plaster next time.  :)
Dino skeletons stuck in sand and plaster layers


The ice blocks were a pretty big hit.  A few kids worked on them for probably an hour.  I chose to leave it open-ended and see what they'd come up with.  It was a chilly day or they might have been successful earlier.  They mostly just brushed with one of the paintbrushes.  Then tried brushing vinegar on them.  Then I gave them some salt to help the melting process and they brushed that on.  Then someone gave them warm water.  Ultimately, a dad busted out a pocket tool and started beating away at it.  :)  Obviously cheap and easy to make.  I filled a baby wipe container about 1/3 of the way and then added a few skeletons.  A few hours later, I filled it another 1/3 and added a few more.  Then later, I filled it the rest of the way.  If I'd filled it all at once, the dinos would have all been floating at the top, partially submerged.  I also put out some goggles as an option, which this little party guest chose to use while working on excavating the skeleton.

Excavating dino skeletons from the ice


One of the biggest hits at the party was a volcano cake.  I made 2 sheet cakes.  One had the volcano and the other was just a normal sheet cake.  Before I brought out the volcano cake, I cut up and pre-plated the other cake so it'd be really easy to pass out.  The volcano cake is a sheet cake with a rice crispy treat volcano around a mini water bottle.  I think if I were to do this again, I'd cut a bottle shaped hole in the cake so I wouldn't have to create such an enormous volcano, but this worked for us.  The cake is a Duncan Hines swirl cake with salted caramel frosting.  The volcano is rice crispy treats with a few chocolate chips mixed in for color.  (This was a full original recipe.  I didn't think I'd need that much, but I wanted the water bottle fully covered.)  Then it's all covered in crushed graham crackers (maybe 1-2 total).  The dinosaurs are just little plastic toys.  To get it to erupt, we put small pieces of dry ice in the bottle (then sang Happy Birthday) then added hot water with strawberry jello mixed in.

Volcano cake


You can see in the photo that the table is splattered with red jello as it shot out when it erupted.  It worked really well.  The cake got pretty soggy where it was soaked in jello, but it sort of tasted like a cake with fruit filling, so it wasn't terrible.  I was glad I had another dry cake (already cut!) for the guests though.

Party favors were all the dinosaurs, bones, and gems they'd found/excavated (all in little orange cloth bags we'd passed out earlier), plus their pith hats they'd decorated, books, and small 3-d puzzles.  (Wow, that seems like a lot now!)  The small orange cloth bags were a Dollar Tree find: 3/$1.  The books were ordered through the Scholastic book club at my daughter's school (6 for $6).  The 3-d puzzles were found on ebay and were about 50 cents each.  They probably weren't necessary but my kids really liked them so we thought others might, too.

Some of the party favors left at the end of the party.


Overall, I think the party was a success!

Tuesday, January 26, 2016

Bubble Birthday Party

Bubble Birthday Party

My son wanted to have a Frozen birthday party, like we'd recently done for his sister.  Since everyone was getting over the Frozen craze at the time, I thought maybe something else would be appreciated by the guests.  It turns out that he really just wanted to have it "snow" like it did at her party.  I suggested a bubble party, complete with bubble machine.  Yes!

First, we ordered a bunch of clear beach balls so they'd look like large bubbles in the grass.  I got 10 that were 16", 5 that were 12" and 4 that were 6" balls from beachballs.com ($1.28-$1.88 each).  I wanted to have a variety to look interesting and also let guests take them home balls for party favors.  This was the most beach ball for the best shipping price combination.

Look closely to see the clear beach ball bubbles on the grass.


We had lots of opportunities for bubbles at the party.  I made my own bubble mix out of distilled water, dawn dish soap, and glycerin (ordered through Amazon for about $15) so we would have plenty to use at the birthday.  I made 6 gallons.  That was excessive.  We maybe used 3 gallons.  But the bubbles work best if they sit for at least 24 hours so I didn't want to end up trying to mix some on the fly.  Having some left over bubbles isn't the worst thing ever and it was basically free after I bought the glycerin.

Then I got a Gazillions Bubble Machine and used it to make a gazillion bubbles.  (My own bubble mix and it worked fine in the machine, but not quite as well.  It was more like dozens of bubbles than a gazillion.  We used the name brand stuff in the machine at the party.  At least until we ran out.)


Of course we used the ol' snow machine to make it snow (like at the Frozen birthday party) because when you know someone with a snow machine, why not?  Besides, this snow is really just bubbles which the birthday boy was quick to point out.  That was a fun addition.


We had a station for making bubble wands using string, straws, and/or pipe cleaners.  We made some examples in advance so the kids could mimic them.  They weren't very interested in making their own, but they liked playing with the examples that were available.  Some adults were intrigued by the geometric figures I'd prepped in advance and wanted to make their own.


We also tried to put people into big bubbles.  I filled a tub with a couple of inches of bubble mix (this is the primary reason I wanted to make my own-- that adds up fast!), got a small hula hoop for $1 at the Dollar Tree (lucky find!) and then put a large bucket in the middle for people to stand in.  I was originally planning on doing a bigger hula hoop that we already had and buying a baby pool, but in addition to the cost of the pool, it would take a lot of bubble mix to fill it enough.  Since the kids are pretty small, I decided that the metal drink bin we already had would be sufficient.   The plastic bucket in the middle prevented wet feet and also meant I needed less bubble mix.  Of course, it's not actually putting them inside a bubble.  It's more like a bubble cylinder, but it was still exciting.  It was really hard to get the bubbles to work on the day of the party (but it worked in tests!) so perhaps I didn't have the right mix or it was too hot or humid.  I maybe should have gone heavier with the glycerin or dawn soap.  The kids still had fun trying though.


The cake was a grocery store cake that my son declared he wanted to have Dusty from Planes on.    Since the store didn't have that, I asked them to just put some clouds and we'd add the plastic plane.  Unfortunately, I couldn't find one!  I finally found a small lego set that is a similar design and color so we used that.  It didn't quite match our bubble theme, but it worked for the birthday boy.  It also solved the problem of him constantly wanting to change the theme.  After we'd started all the bubble prep, I didn't want to abandon for a new theme, but I told him he could change whatever he wanted on his cake until it was ordered.  He was ultimately happy with his cake.


The biggest hit of the party were the pool noodle bubble tubes.  I didn't know if the kids would like this at all, but they loved it.  The party could have been foam tubes and cake and they'd have been content.  Just rubber band a piece of cloth to a segment of pool noodle.  (One pool noodle was cut into 8 pieces.)  Kids dip the cloth into a tray of bubble mix and then blow LOTS of tiny bubbles.  It's like foam.  They loved it.  Pro Tip: Tell the kids to take the tube away from their mouths before inhaling to blow in it again or they will wind up with a mouthful of soap.  Maybe not dangerous, but unpleasant.

One of our test designs.  We cut the hand towel into quarters for the final design.

Foam bubbles that are fun to blow away.
Another big hit at the party was a gift that was opened during the party.  Foam stomp rocket.  The kids thought it looked neat and the last portion of the party was them taking turns stomping on it and chasing the foam rockets around the yard.


Party dad retrieving a rocket from the plants.  You can also see the large beach ball "bubbles" in the yard.


Our party favors were the clear beach balls, bubble tubes, and large bubble wands.  The kids used the tubes during the party and then took them home.  They LOVED having a couple of beach balls to take home.  The large bubble wands were a big hit, too.  Can't have too many bubbles, right?

The bubble tubes arranged around a rainbow of bubble wands.  These were party favors along with clear beach ball "bubbles."


I also must mention the adorable baby (my nephew) who was put in a bin (dry!) with several of the beach ball bubbles and we blew more bubbles around him.  I thought it would be an amazing photo op.  Unfortunately, he didn't agree and this was the best pic we got.  Might be a cute idea for other kids, though!


Monday, January 25, 2016

Rainbow Birthday Party


Rainbow Birthday Party


For her 5th birthday, my daughter requested a rainbow party.  We had some activities, a lot of food, and some rainbow cupcakes. 

Because we only had a handful of kids at this party, the activities were minimal.  They primarily played on their own.  We had some beads and pipe cleaners to make rainbow bracelets, some water color paints/crayons and construction paper, and some typical backyard activities like balls/rackets and, of course, our play structure.  The group of 2-5 year olds were happy to just run around and play so more activities weren't really necessary.
Typical backyard activities for the kids.  (And new barbecue for lunch!)

Additional activities: pipe cleaner/bead bracelets, water color painting, and coloring
We also served burgers with fruit and potato salad for lunch, of course with a rainbow of plate and napkin options!  In addition, Grandma decided that the rainbow party needed rainbow food so she came up with some great ideas.  She served layered jello in little glasses with some tiny spoons and fruit rainbows on skewers that were displayed in watermelon.  Nice work, Grandma!

Fruit salad, jello, and fruit skewers with a rainbow of plates and napkins.

The cupcakes were the most involved part of this party. We used white cake but mixed it with food coloring and swirled to make colorful insides and then used various colors of frosting to frost each one.  This seems like an easy task, but given that I had a 2 year old and nearly-5 year old who wanted to be heavily involved in each step, I think it took us something like 7 hours.  (I was also using a single cupcake pan.)  

2 year old and nearly 5 year old swirling some of the cupcakes


LOTS of cupcakes were needed to make the rainbow

  I made considerably more cupcakes than we needed, but it was necessary in order to make the arc of the rainbow and have all the "necessary" colors, and also clouds (all by request of the birthday girl).  Perhaps mini cupcakes would have made more sense, unless we were actually having 50+ people there.  Counting grandparents, aunts/uncles, etc, I think we had 8 kids and 16 adults.  I probably could have done a dozen cupcakes for this crowd but in order to get the rainbow effect, I had to make 5 dozen.  (Plus another dozen since the box cake make 2 dozen each.)  Oh well!  It looks good, right?


Rainbow of cupcakes!


For party favors, we'd intended to have a bunch of the black rainbow scratch paper but the order was messed up and they were delivered about an hour after the party.  :(  The kids got water colors, crayons, and some stickers (along with whatever they created) but the scratch paper was supposed to be the star and it didn't make it.  What a bummer!  The little guests were happy enough and the parents were glad I didn't just rush out to buy more trinkets they didn't need, so I guess it worked out fine.  (I'm still sort of embarrassed about my paltry offering for party favors though.)  I learned to order earlier though so a re-order can still make it if the first round is messed up though!

Overall, the party went well.  The group of guests were wonderful and we had a great time.  Happy birthday little T!